


Apr 11, 2019 19:30 UTC
| Updated:
Apr 12, 2019 at 09:23 UTC
How To Create Your First Ethereum Wallet?
If you are a crypto enthusiast and are looking to store Ethereum in a digital wallet, you might be wondering how to go about creating your very first Ethereum wallet?
In that case, we can help you figure out how to go about creating your very own Ethereum wallet. But if you have no clue about why you might possibly need an Ethereum wallet, read on to find out.
An Ethereum wallet can be used to receive Ether tokens and in turn store them. With the advent of Initial Coin Offerings (ICOs), more people want to find out about new projects to invest in.
An ethereum wallet will allow its user to receive tokens from various new ICOs, via distributions called airdrops. Without it, a user cannot receive these tokens.
You May Also Read: How is Ethereum Different Than Bitcoin?
How To Create Your First Ethereum Wallet: A 5 Step Guide
Step 1
The first step is to visit www.myetherwallet.com.
This site will allow you to create your Ethereum digital wallet. Once you are on the site, you will find a safety popup, which you can either click through or skip by clicking on the corner box.
Once that is done, you will see the option to create a new wallet.
Step 2
To secure your new wallet, you will need to set a password for your wallet. This password needs to be strong and unique so that your wallet is not easily breachable.
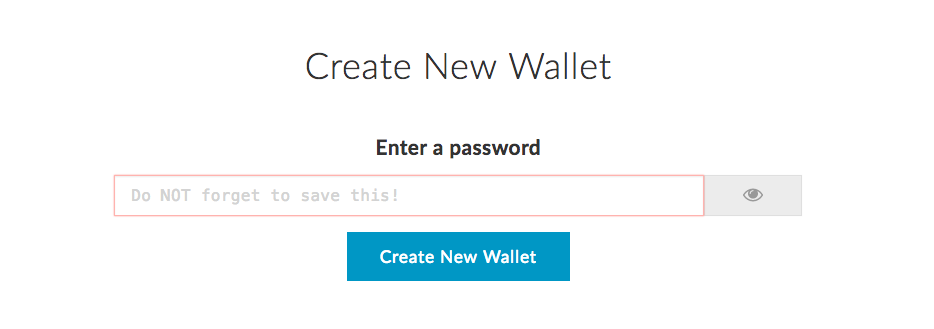
Once you have entered the new password, click on “Create New Wallet”. Note that there is no option to reset your password like is provided for our other accounts. So make sure to either remember it well or note it down somewhere.
Step 3
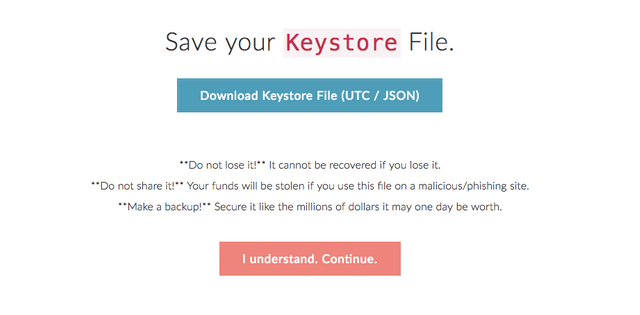
In the next step, you must download your JSON recovery file. This is the keystore file which is your recovery file. You should ideally store it someplace safe and make sure to keep a backup.
You will require the keystore file, along with your password, to access your wallet. Under no circumstances should you lose this file.
Step 4
In the next step, you will see your private key. This private key is very important so make sure you save it safely and create a backup somewhere.

Step 5
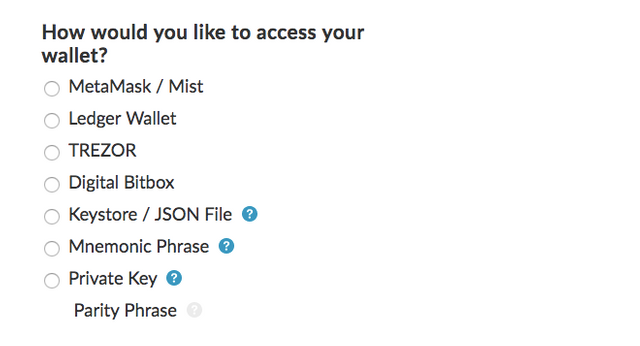
Well that’s pretty much it. You will now see many options to login. You can now use either your keystore file or your private key to unlock your wallet. Just upload the file or paste in the private key and enter your password.
 All done, there you have it! Your first Ethereum wallet is ready.
Here Are Few Articles For You To Read Next:
- Top 5 Ethereum-based Decentralized Applications
- Can Ripple Ever Overtake Ethereum?
- How To Buy Ethereum With PayPal?

Sumedha Bose
Sumedha uses words as her crutch to get by in life. She takes a keen interest in debating, dancing and destroying the patriarchy in her free time.